
Oh, Halloween! It’s practically my favorite holiday because, let’s be honest, the food is just too much fun. I’m always looking for ways to make our get-togethers extra special, and nothing screams festive like a killer spooky Halloween charcuterie board. I still remember the first time I attempted one for a neighborhood potluck – pure chaos, but in the best way! Seeing everyone’s eyes light up as they picked at the “mummy” prosciutto and “monster eye” grapes made all the last-minute arranging totally worth it. It’s honestly the perfect centerpiece, bringing together savory, sweet, and a little bit of spooky, all while being ridiculously easy to pull together. Plus, it’s always a huge hit! If you’re planning a Halloween bash, you HAVE to check out these Halloween food and drink ideas too!
Why You’ll Love This Spooky Halloween Charcuterie Board
Seriously, this board is a lifesaver when you want to impress without a ton of work! Here’s why it’s become my go-to for Halloween:
- Super Easy to Assemble: No complicated cooking involved! It’s mostly just arranging things, which means less stress for you.
- Visually Stunning: It looks like you spent hours crafting it, but it comes together in a flash. The spooky details are just so fun!
- Crowd-Pleaser: Who doesn’t love a charcuterie board? This Halloween twist makes it even more exciting for everyone, from little monsters to grown-up ghouls.
- Customizable: You can totally switch up the ingredients based on what you love or what you can find. It’s your spooky masterpiece!
- Perfect for Any Party: Whether it’s a big bash or a cozy family night, this board fits right in and adds that extra festive sparkle.
Gather Your Spooky Halloween Charcuterie Board Ingredients
Alright, let’s get down to business! To make your spooky Halloween charcuterie board truly terrifyingly delicious, you’ll need a few key players. Don’t worry if you can’t find *exactly* what I used; the fun is in customizing it! But here’s what I typically grab:
- For the Creatively Spooky Cheese:
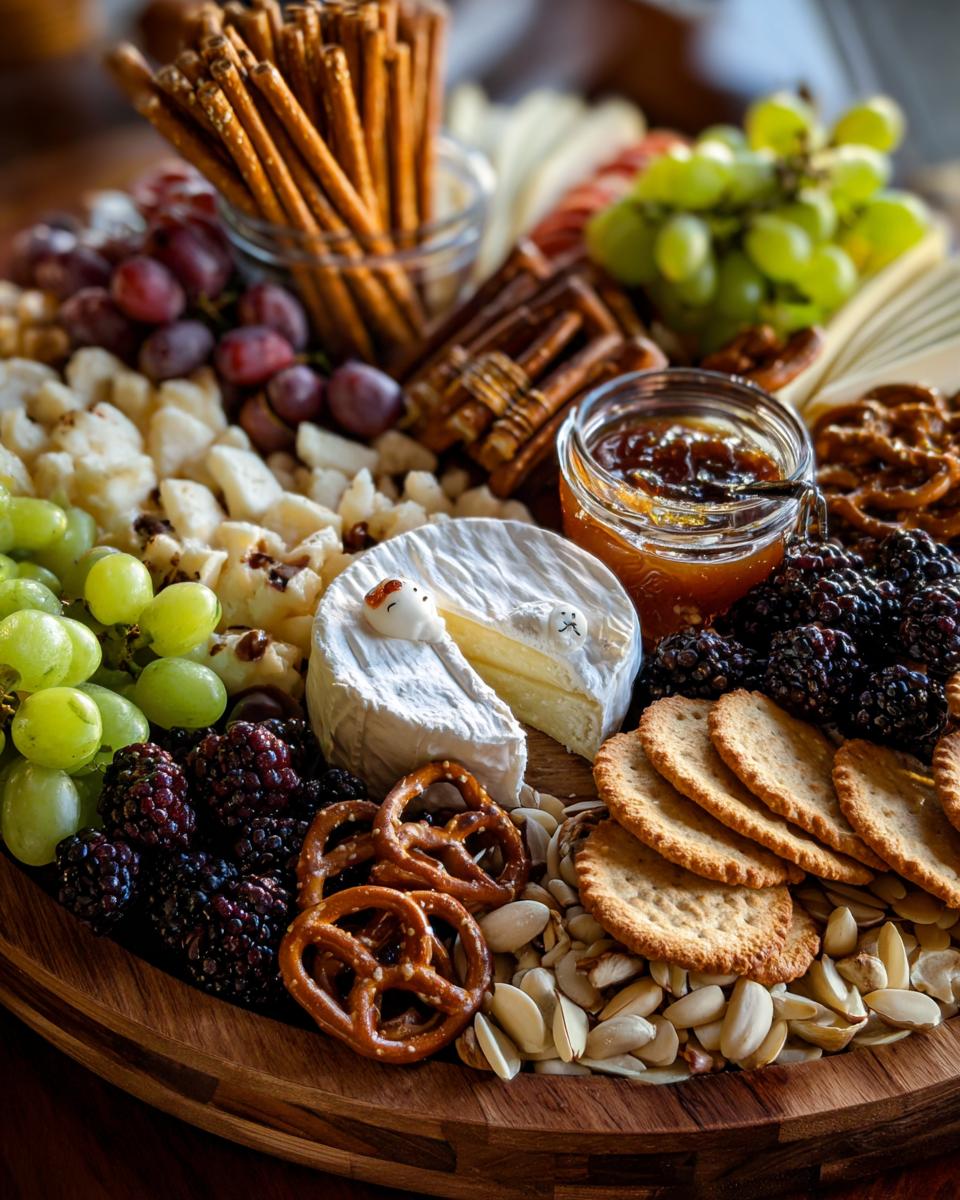
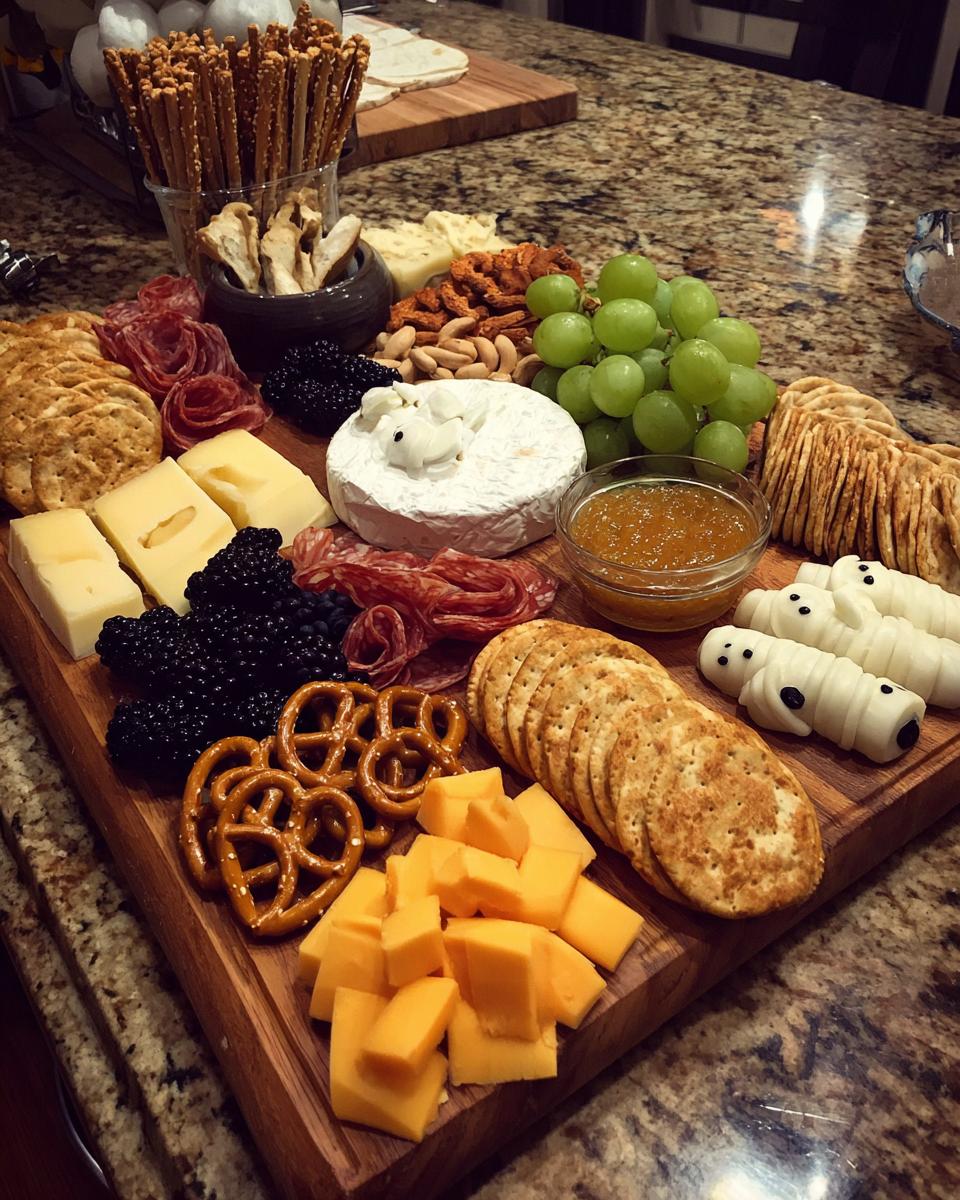
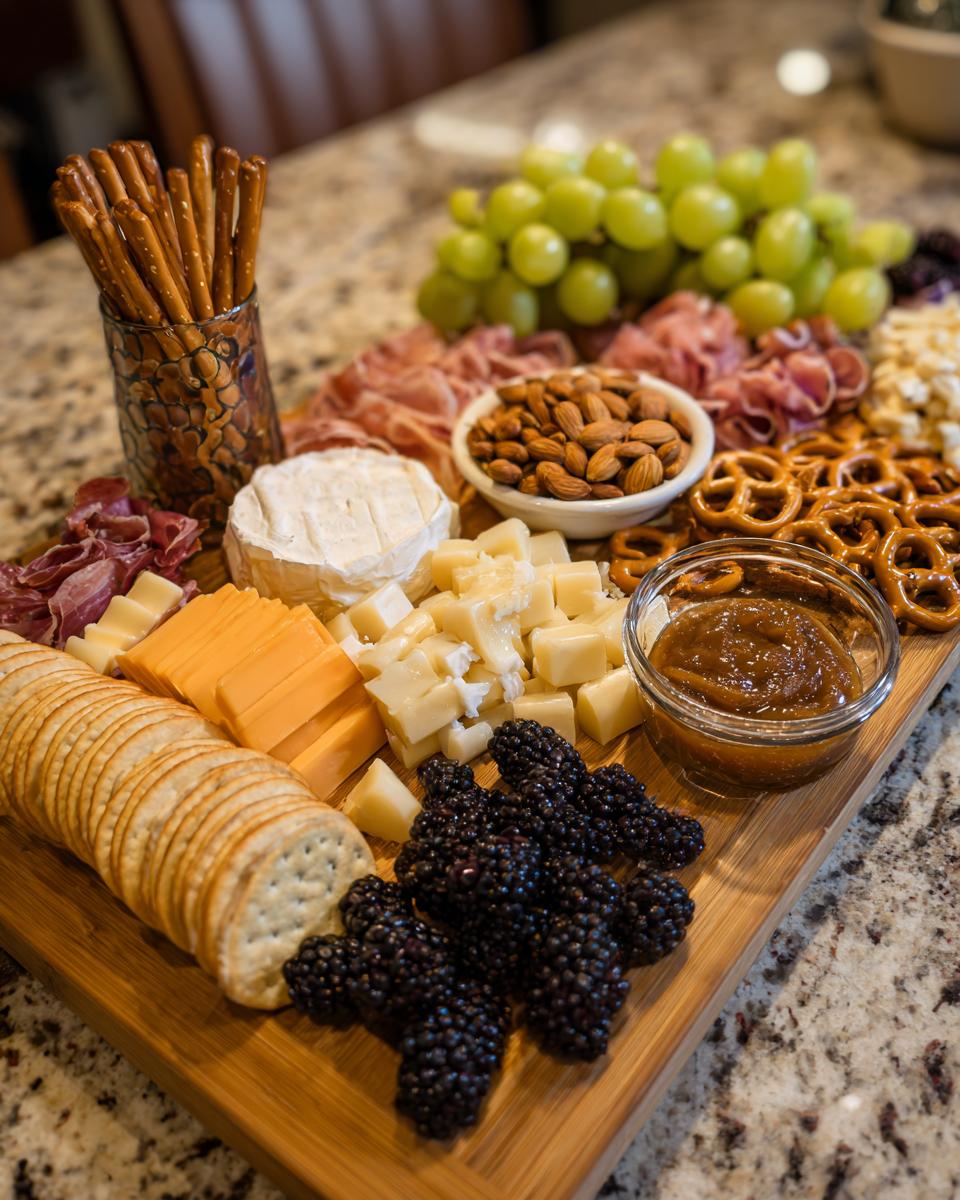
- 1 block of creamy Brie cheese – I like to turn this into a cute little ghost!
- 1 package of sharp Cheddar cheese, sliced up – perfect for cutting into shapes or filling gaps.
- The Meaty Morsels:
- 1 package of Prosciutto – rolling these into little mummy shapes is a must!
- Fruity Frights:
- 1 cup of green grapes – these are my secret weapon for making creepy “monster eyes.”
- 1 cup of blackberries – their dark color makes them perfect for “spider bodies.”
- Crunchy Critters & Carbs:
- 1 cup of pretzel sticks – essential for those spindly “spider legs.”
- 1 cup of assorted crackers – I grab a few different kinds for variety and texture.
- The Extra Spooky Details:
- 1/2 cup of whole almonds – we’re going to turn these into spooky “witch fingers”!
- 1/4 cup of fig jam – this acts as our spooky, eerie “blood.”
- 1/4 cup of caramel dip – think of this as bubbling “witch’s brew.”
See? It’s not too crazy, but each item plays a role in making the whole board pop with Halloween spirit!
Essential Equipment for Your Spooky Halloween Charcuterie Board
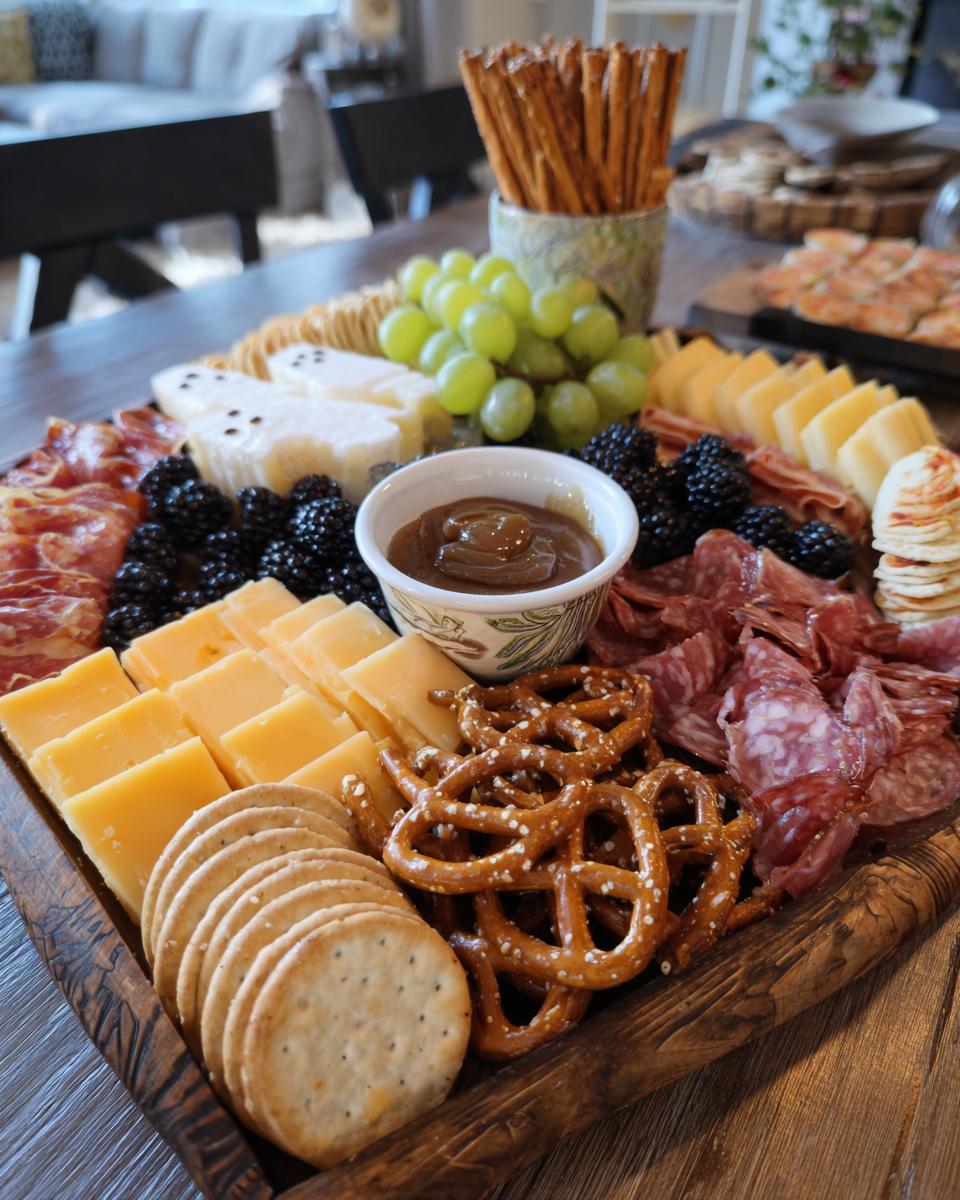
Alright, you don’t need a whole lot of fancy gadgets for this, but a few key items will make assembling your spooky Halloween charcuterie board so much easier and way more effective. First, you’ll absolutely want a nice, big serving board or platter! Bigger is usually better so you can really spread out and make it look abundant. I also grab a few small bowls – perfect for holding those little dips like the “blood” fig jam or the “witch’s brew” caramel. Oh, and don’t forget a good cheese knife; it makes cutting the Brie into a ghost shape a whole lot less messy!
Step-by-Step Guide to Assembling Your Spooky Halloween Charcuterie Board
Okay, assembling this spooky Halloween charcuterie board is where the real magic happens, and honestly, it’s more fun than fuss! Think of it like painting a picture, but with delicious edible things! We’re going to build this spooky scene layer by delicious layer.
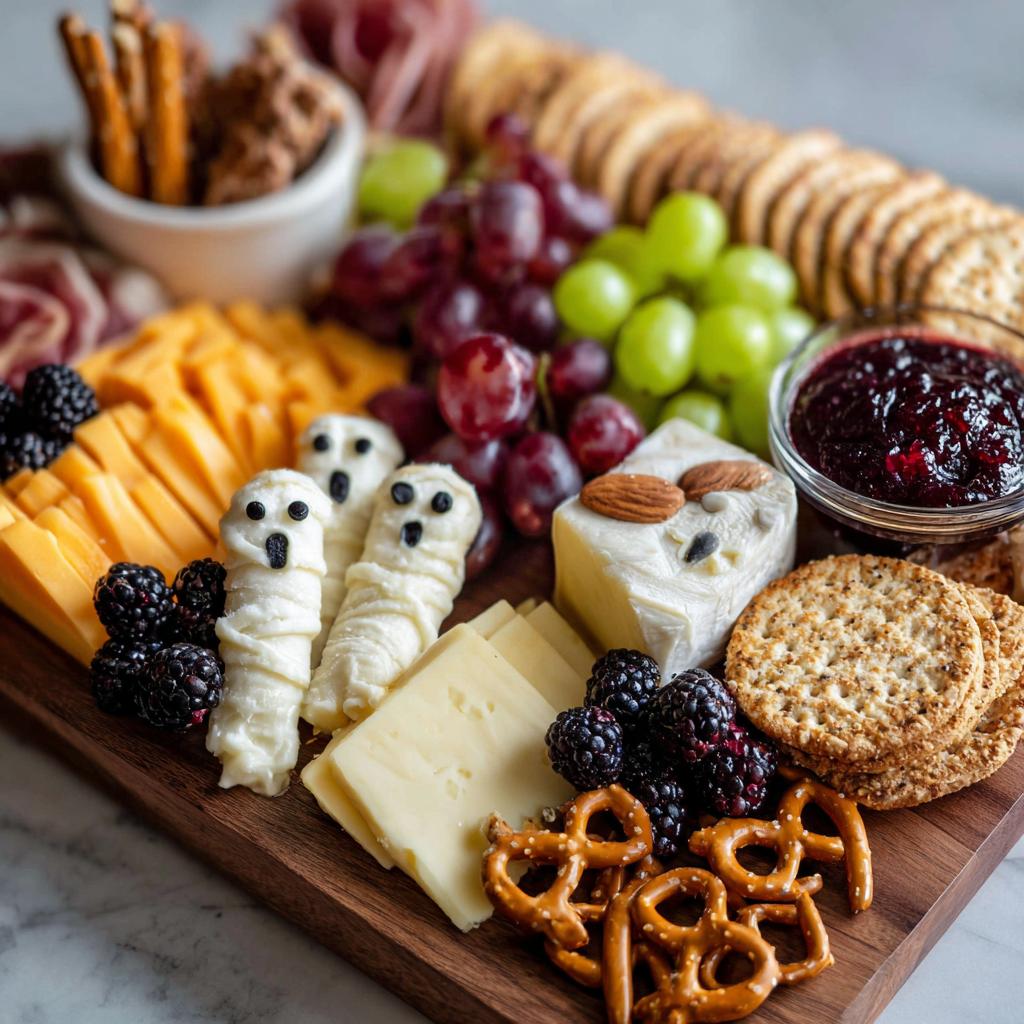
First things first, let’s get our star players prepped. Grab your Brie and carefully cut it into a cute little ghost shape – don’t worry if it’s not perfect, that’s part of the charm! Then, take those prosciutto slices and roll them up like little spooky mummies. I like to wrap them around a small pretzel stick or a tiny cube of cheddar to give them some body behind the strips of prosciutto. For our “witch fingers,” take those almonds and carefully add a little dab of the fig jam or even a tiny dot of edible food marker near the tip to look like a fingernail. It sounds fiddly, but trust me, it makes such a difference!
Once everything’s prepped, it’s time to arrange! Start with your biggest items, like that adorable Brie ghost and the cheddar slices, and place them strategically on your big board. Then, snake in those small bowls. I like to put the “witch’s brew” caramel dip in one and the “blood” fig jam in another – maybe add a little handwritten label for extra effect!
Now, we fill in the gaps! This is where the board really starts to come alive. Nestle in those prosciutto mummies, scatter the grapes to look like big, staring “monster eyes,” and use the blackberries as the bodies of our creepy-crawly spiders. Stick those pretzel sticks into the blackberries to make the legs – so easy, so effective!
Tuck in your crackers all around, making sure there’s easy access to everything. And don’t forget to place your “witch fingers” where they look like they’re reaching out from the board! My biggest tip here is to not be afraid to overlap things a little. It makes the board look more abundant and less… well, organized! It adds to that perfectly chaotic spooky vibe. We actually have some quick dinner recipes that are fun, but this is pure entertainment before the eating even starts!
And there you have it! A stunning spooky Halloween charcuterie board that’s ready to wow your guests. It really comes together beautifully, and the best part is how much fun you’ll have making it.
Tips for the Ultimate Spooky Halloween Charcuterie Board
Okay, so you’ve got the basics down, but let’s talk about taking this spooky Halloween charcuterie board from “wow” to “HOLY COW, THAT’S AMAZING!” I love tweaking this board every year, and I’ve picked up a few tricks that really make it shine. It’s all about those little details that scream Halloween!
- Get Creative with Shapes: Don’t just slice cheese willy-nilly! Use cookie cutters to make little pumpkins, bats, or ghosts out of cheddar. And seriously, the Brie ghost? It’s non-negotiable for me now. It adds instant personality!
- Think Texture and Color: Mix it up! You want smooth cheeses, crunchy crackers, chewy dried fruit (maybe some candy corn if you’re feeling extra sweet?), and of course, plenty of spooky fruits and veggies. Think about contrasting colors too – the dark blackberries against the light grapes are a perfect example. If you’re feeling super adventurous, maybe add some fun Halloween cookies on the side!
- Don’t Forget the “Spooky Sauce” Labels: Those little handwritten labels for the jam and dip? They’re simple, but they really sell the theme! I usually use little kraft paper tags and a fun marker. It’s these little touches that make it feel so personal and thoughtful.
- Add Some Greenery (the spooky kind!): Sometimes I’ll tuck in a few sprigs of rosemary or kale around the edges to look like creepy dead bushes or spooky vines. It adds a nice touch of color and makes the whole board feel more immersive. Just make sure they’re clean and food-safe, of course!
Frequently Asked Questions about Spooky Halloween Charcuterie Boards
Got questions about wrangling this spooky spread into something amazing? I totally get it! Let’s tackle some common things people ask about making the ultimate spooky Halloween charcuterie board happen.
Can I make parts of this spooky Halloween charcuterie board ahead of time?
Oh, absolutely! This is key for stress-free hosting. You can definitely shape your Brie ghost, roll your prosciutto mummies, and even prep your “witch fingers” a day in advance. Just pop them into airtight containers in the fridge. Fruits like grapes and blackberries are best washed and patted dry just before assembly so they don’t get mushy. The crackers and pretzels should stay in their packages until you’re ready to build the board to keep them nice and crisp!
What are some good substitutions for the spooky Halloween charcuterie board?
You know, the beauty of these boards is they’re totally flexible! If you’re not into Brie, a creamy goat cheese or even a sharp white cheddar cut into shapes works wonderfully. For the prosciutto mummies, you could try thinly sliced salami or even rolled-up deli turkey if you prefer. Instead of grapes for eyes, black olives or small mozzarella balls with a dot of black edible marker are super cute! And for crackers, anything you love will do – gluten-free options or even little breadsticks make great substitutes.
How do I keep my spooky Halloween charcuterie board fresh?
The trick to keeping it fresh is timing and temperature! Assemble the board as close to serving time as possible, ideally within an hour or two. If you need to assemble it a bit earlier, cover it loosely with plastic wrap. Keep it in a cool spot, but avoid direct sunlight or warm kitchens, as that can make the cheese sweaty and the crackers soggy. Definitely don’t leave it out at room temperature for more than two hours, just for food safety!
Serving and Storing Your Spooky Halloween Creation
Alright, your amazing spooky Halloween charcuterie board is ready to be devoured! The best way to serve it is at room temperature, so try to pull it out of the fridge about 30 minutes before your guests descend. This really lets the flavors of the cheeses and meats shine. Just pop it on your beautiful board, maybe add those little labels I mentioned for flair, and let everyone dig in! If, by some spooky miracle, you have leftovers (which never seems to happen in my house!), just gently wrap the board with plastic wrap or transfer items into airtight containers. You can keep it in the fridge for a day or two, though honestly, it tastes best fresh off the board. Want some easy dinner recipes for the rest of the week? We’ve got those too!
Estimated Nutritional Information
Alright, let’s talk numbers! Keep in mind this is just a rough estimate, since everyone’s spooky Halloween charcuterie board looks a little different. But generally, with about 8 servings, you’re looking at around 400-500 calories per person. You’ll get a good mix of fats (hello, cheese and prosciutto!), some protein, and a decent amount of carbs from the crackers and pretzels. The exact breakdown really depends on the brands and quantities you use, but it’s definitely a festive feast!
Share Your Spooky Halloween Charcuterie Board Masterpiece!
I absolutely LOVE seeing your creations! Seriously, it makes my day when you guys try out the recipes. If you’ve put together your own spooky Halloween charcuterie board using my tips, I would be SO thrilled if you’d share a pic in the comments below. Or tag me on social media if you’re feeling fancy! Tell me what you did differently, what your favorite part was, or even leave a quick rating. Seeing your spooky masterpieces really inspires me and helps other folks too!
Spooky Halloween Charcuterie Board
Ingredients
Equipment
Method
- Prepare your ingredients. Cut the brie into a ghost shape. Roll prosciutto into mummy shapes by wrapping thin strips around a small piece of cheese or a pretzel stick. Use almonds with a small dab of jam or edible marker to create witch fingers.
- Arrange the large items on your serving board first, such as the brie ghost and cheddar slices. Place small bowls for dips and nuts.
- Fill in the gaps with the remaining ingredients. Place the prosciutto mummies, grapes for eyes, blackberries, and pretzel sticks for spider legs.
- Add crackers and witch fingers around the board. Spoon the fig jam into a small bowl and label it “blood.” Place the caramel dip in another bowl and label it “witch’s brew.”
- Serve immediately and enjoy your spooky creation!