
There’s something almost magical about roasting pumpkin seeds in the oven—it turns those slimy, forgotten guts from your jack-o’-lantern into the most addictive, crunchy snack. My love for roasted pumpkin seeds started years ago when my grandma showed me how to rescue them from the compost pile. She’d toss them with just a touch of salt and olive oil, and I swear, the smell alone made our whole kitchen feel like fall. Beyond nostalgia, they’re packed with protein and fiber, making them the guilt-free snack I reach for all season long. Best part? It takes barely 30 minutes from start to crispy finish.
Why You’ll Love Roasting Pumpkin Seeds in the Oven
Listen, I know you’re busy—we all are. That’s why roasting pumpkin seeds in the oven is my go-to snack hack. Here’s why you’ll be obsessed too:
- Crazy easy: Just toss, bake, and forget (well, almost—you’ll want to stir them once or twice). No fancy skills needed.
- Healthy crunch: Packed with protein and fiber, they keep you full way longer than chips. My secret weapon against 3pm snack attacks.
- Flavor playground: Start with basic salt, then go wild. I’ve done everything from cayenne to cinnamon sugar—more on that later!
- Zero waste win: Those seeds were headed for the trash? Not on my watch. Grandma would be proud.
- Perfect texture: The oven gives that ideal crispy-chewy balance you just can’t get from store-bought.
Seriously, once you try homemade, you’ll never go back to those sad, stale bags at the store again.
Ingredients for Roasting Pumpkin Seeds in the Oven
Wait a minute – before you throw those pumpkin guts away, let me tell you what you’ll need to transform them into gold. These are the simple staples I always have ready when pumpkin carving season hits (and trust me, you probably already have most in your pantry):
- 1 cup pumpkin seeds – straight from your pumpkin, cleaned and patted dry (those stubborn bits of pulp give it character!)
- 1 tbsp olive oil – or melted butter if you’re feeling indulgent
- ½ tsp salt – kosher or sea salt works best here
That’s it for the basics! Though I can never resist adding extras – a pinch of garlic powder or smoked paprika when I’m craving savory, or cinnamon and sugar when I want something sweet. But honestly? Sometimes pure simplicity wins.
Equipment Needed for Roasting Pumpkin Seeds in the Oven
I’ll let you in on a little secret – you don’t need fancy gadgets to make perfect roasted pumpkin seeds. In fact, my grandma used the same two trusty tools every year, and they’ve never failed me either:
- Baking sheet – Any old sheet pan will do, though I’m partial to my well-loved half sheet pan with slightly raised edges (catches any runaway seeds!)
- Mixing bowl – Just big enough to toss everything together. No bowl? No problem – I’ve used a deep plate in a pinch when all my dishes were dirty.
That’s seriously all you need! Though I’ll confess – sometimes I skip the bowl entirely and toss the seeds right on the pan with my hands. Cooking should be fun, not fussy, right?
How to Roast Pumpkin Seeds in the Oven
Okay, folks – this is where the magic happens! Roasting pumpkin seeds in the oven is so simple, my eight-year-old nephew could do it (and actually has – with minimal supervision!). Here’s exactly how I do it every fall, with all the little tricks I’ve picked up over the years.
First, preheat your oven to 300°F (150°C). Don’t be tempted to crank it higher – low and slow is the secret to perfectly crispy seeds without burning them. Line your baking sheet with parchment if you’re fancy, but honestly? I usually skip it because I love those crispy little specks that stick to the pan – bonus snack!
Now, take your cleaned pumpkin seeds and toss them in a bowl with the olive oil and salt. Here’s my pro move: massage the oil into those seeds with your fingers for about 30 seconds. You’ll feel them go from slippery to slightly sticky – that’s when you know every nook and cranny is coated.

Spread them out in a single layer on your baking sheet. Don’t crowd them! I make sure none are overlapping, or they’ll steam instead of getting that perfect crunch. Pop them in the oven and set a timer for 10 minutes.
When the timer goes off, pull out the tray and give the seeds a good stir. This is where you can check out our 4-flavor pumpkin seed variations if you want to get creative! Put them back in for another 5-10 minutes, watching closely. You’ll know they’re done when they turn golden brown and make that wonderful “tink tink” sound when you stir them.

Take them out and let them cool completely on the pan – I know it’s hard to wait, but this is when they get their ultimate crispness. Within minutes, your kitchen will smell like a cozy autumn dream, and you’ll have the most addictive snack ready to devour!
Tips for Perfect Roasted Pumpkin Seeds in the Oven
After burning one too many batches (RIP, Halloween 2018), I’ve learned all the tricks for perfect roasted pumpkin seeds in the oven. Here’s what I wish I knew when I started:
- Stir with love: Set a timer for every 5 minutes after the halfway mark. I use a wooden spoon to flip them—those edges go from golden to charcoal scary-fast!
- Listen closely: They’re done when you hear that satisfying “tink” sound as seeds hit the pan. If they smell nutty but not burnt, you’re golden (literally).
- Season smart: Add spices halfway through baking to prevent burning. My trick? Toss with oil first, then sprinkle seasonings when you do the first stir.
- Patience pays: Let them cool completely on the pan—they crisp up as they sit. Sneak a taste too soon and they’ll disappointingly chewy (ask me how I know).
Trust me, these tiny tweaks make all the difference between “meh” and “more please!”
Flavor Variations for Roasting Pumpkin Seeds in the Oven
The best part about roasting pumpkin seeds in the oven? You can dress them up however you want! I love experimenting with flavors depending on my mood. Here are my go-to combos that always get devoured:
- Sweet Tooth Fix: Toss with 1 tsp cinnamon and 1 tbsp sugar right after baking (the residual heat makes it stick perfectly). Sometimes I drizzle mine with honey!
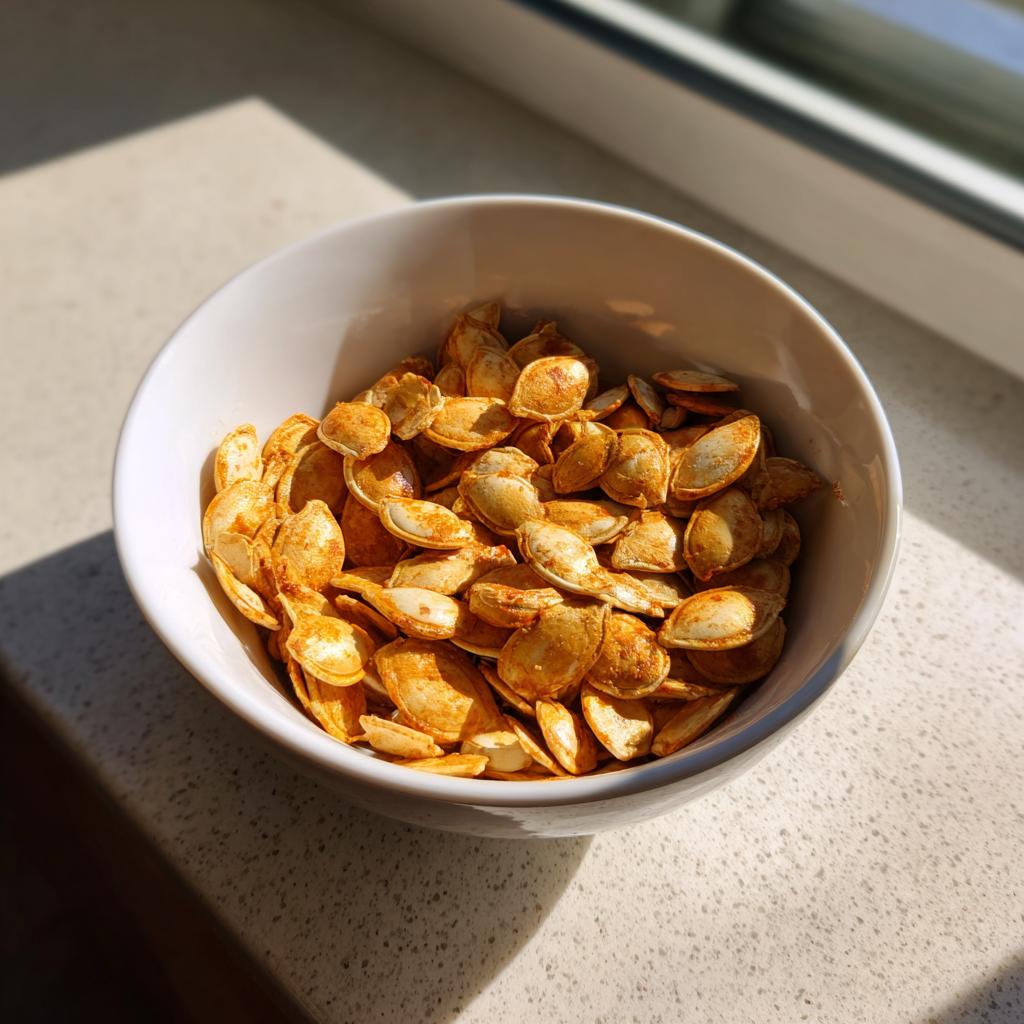
- Spicy Kick: Add ½ tsp each smoked paprika and cayenne for seeds that pack some heat. My brother calls these “danger seeds” – you’ve been warned!
- Savory Crunch: Stir in 1 tsp garlic powder and a pinch of onion powder before roasting. These disappear fastest at my house!
Need more ideas? Check out our 4-flavor pumpkin seed variations for even more creative twists. Honestly though? Even just good ol’ salt is perfection when the seeds are freshly roasted.

Storing and Reheating Roasted Pumpkin Seeds
Here’s the good news – if by some miracle you have leftover roasted pumpkin seeds (it happens!), they keep beautifully. Just toss them in an airtight container at room temperature – I use an old mason jar with the lid cranked tight. They’ll stay crispy for up to a week, but let’s be real… mine never last that long! If they lose their crunch, a quick 5-minute toast in a 350°F oven revives them perfectly. Microwave works in a pinch too, but watch them – they go from revived to rubbery in seconds!
Nutritional Information for Roasted Pumpkin Seeds
Let’s get real for a sec—I’m not a nutritionist, just a pumpkin seed fanatic who likes knowing what’s going into my snack habit. Those golden little nuggets pack a surprising protein punch and fiber boost, with healthy fats from the olive oil. But here’s the deal: nutritional values can vary based on your exact ingredients and portions. Whether you go heavy-handed with the salt (no judgment!) or light on the oil, the numbers will shift. Just know you’re munching on something way better than whatever’s in that vending machine!
Frequently Asked Questions About Roasting Pumpkin Seeds in the Oven
Can I use fresh pumpkin seeds straight from the pumpkin?
Absolutely! Fresh seeds are actually my favorite – that slimy texture means they’re packed with flavor. Just give them a quick rinse to remove the stringy pulp, then pat them dry with a clean towel. Don’t stress about getting them bone-dry – a little moisture helps the seasoning stick. Pro tip: spread them on a baking sheet for an hour before roasting if you want extra crispiness!
Why are my roasted pumpkin seeds chewy instead of crispy?
Ugh, been there! Usually means one of three things: your oven temp was too high (low and slow wins here!), you didn’t stir them enough during baking, or – here’s the big one – you ate them too soon. Let them cool completely on the pan – I know it’s hard, but that’s when the magic crunch happens. Also check that you’re using enough oil – about 1 tbsp per cup of seeds does the trick.
Can I roast pumpkin seeds without oil?
Technically yes, but… they won’t get that irresistible crispy texture we’re after. The oil helps conduct heat evenly and makes the seasonings cling. If you’re avoiding oil, try a quick spritz of cooking spray – just enough to barely coat them. But honestly? That tablespoon of olive oil for a whole batch is worth it for the perfect crunch-to-flavor ratio.
How long do roasted pumpkin seeds last?
Stored in an airtight container at room temp, they’ll stay crunchy for about a week – if they last that long! The oil can go rancid eventually, so I recommend sniffing them if they’ve been sitting awhile. Pro tip: I stash half the batch in the freezer if I miraculously haven’t eaten them all in two days. They thaw instantly and taste just-roasted.

Roasted Pumpkin Seeds
Ingredients
Equipment
Method
- Preheat the oven to 300°F (150°C). Line a baking sheet with parchment paper.
- In a bowl, toss the pumpkin seeds with olive oil and salt until evenly coated.
- Spread the seeds in a single layer on the prepared baking sheet.
- Bake for 15-20 minutes, stirring occasionally, until golden brown and crispy.
- Remove from the oven and let cool before serving.