Oh my gosh – I’ve got the best Halloween veggie tray idea to share with you! Every year, my kids’ friends expect me to bring something spooky and fun to our neighborhood Halloween party. I used to stress about making sugary treats, but now? I just whip up this frightfully good veggie tray instead. It’s always the first thing to disappear from the buffet table – way before the candy! The secret is turning ordinary veggies into little creepy creatures. Last year, my pepper ghosts and olive-eyed monsters got so many compliments, I think the parents liked them even more than the kids did. Trust me, this is the perfect way to balance out all that Halloween sugar while keeping things deliciously spooky!
Why You’ll Love These Halloween Veggie Tray Ideas
Let me tell you why this veggie tray is my go-to Halloween party trick:
- So easy even a zombie could do it – No fancy cooking skills needed! Just chop, arrange, and watch everyone go “Ooooh!” when you bring it out.
- Sneakily healthy – Kids (and let’s be honest, tipsy adults) will gobble up veggies without realizing they’re eating something good for them.
- Instantly festive – Turns boring crudités into a showstopper that’ll have people snapping pics before they dig in.
- Perfect for last-minute hosts – When you forget you signed up to bring something until the day of? This tray saves the day in 20 minutes flat.
Seriously, it’s my favorite way to make vegetables actually exciting on a holiday that’s usually all about candy overload!
Ingredients for Your Spooky Halloween Veggie Tray
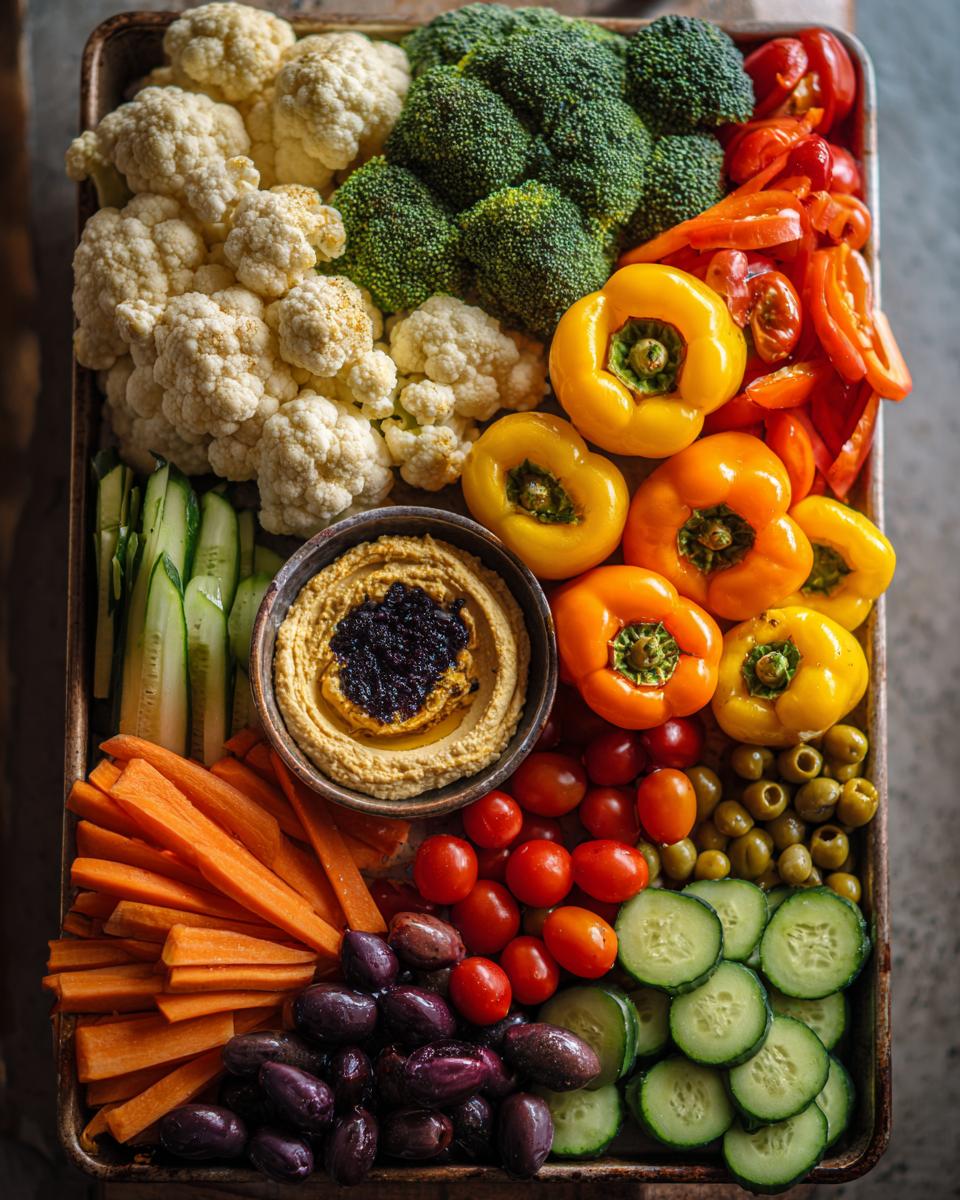
Okay, let’s raid the fridge for our creepy crudités! Here’s exactly what you’ll need to make this Halloween veggie tray scream (in a good way). I’ve broken it down so you can see how simple this really is – just a few fresh ingredients and two killer dips!
For the Base (aka Your Spooky Canvas)
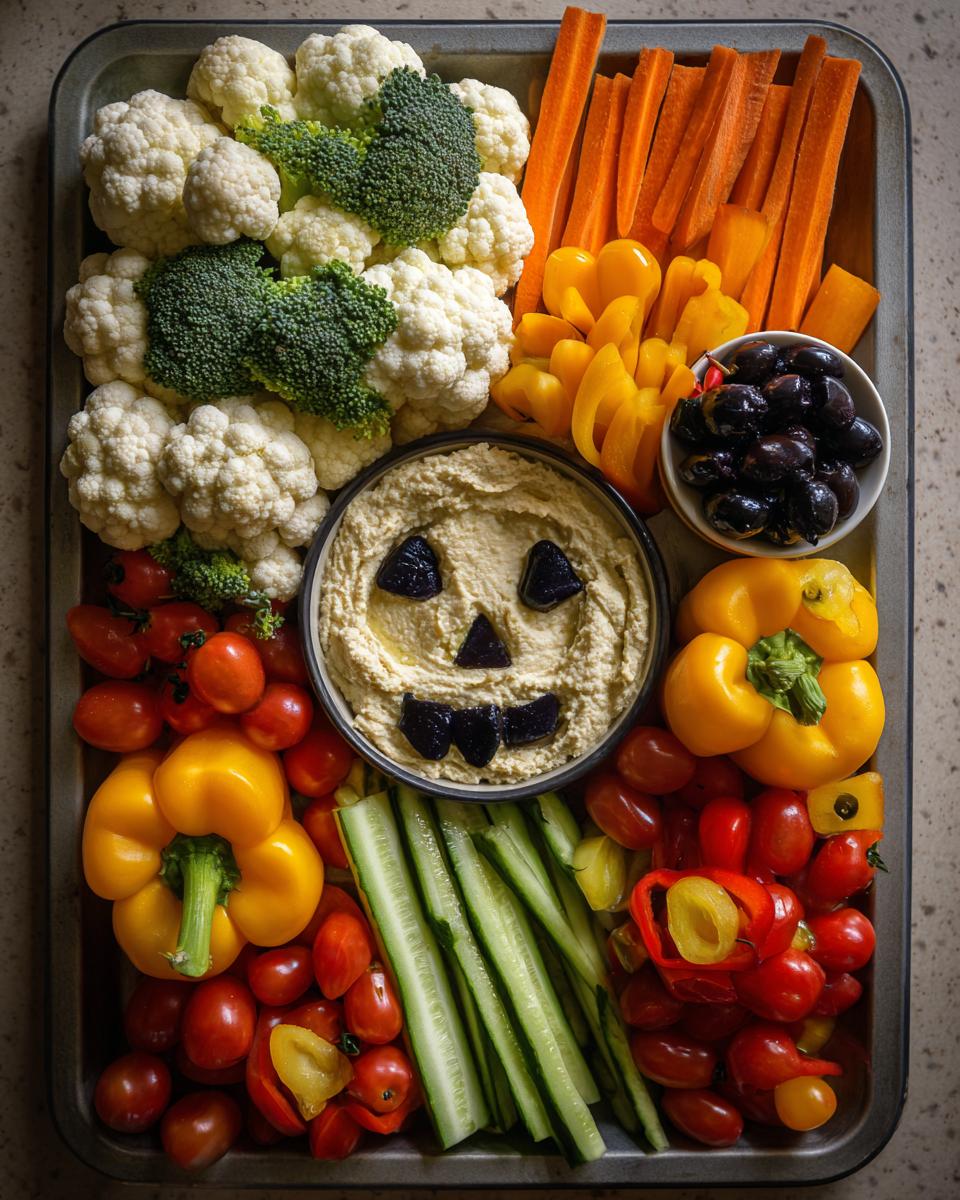
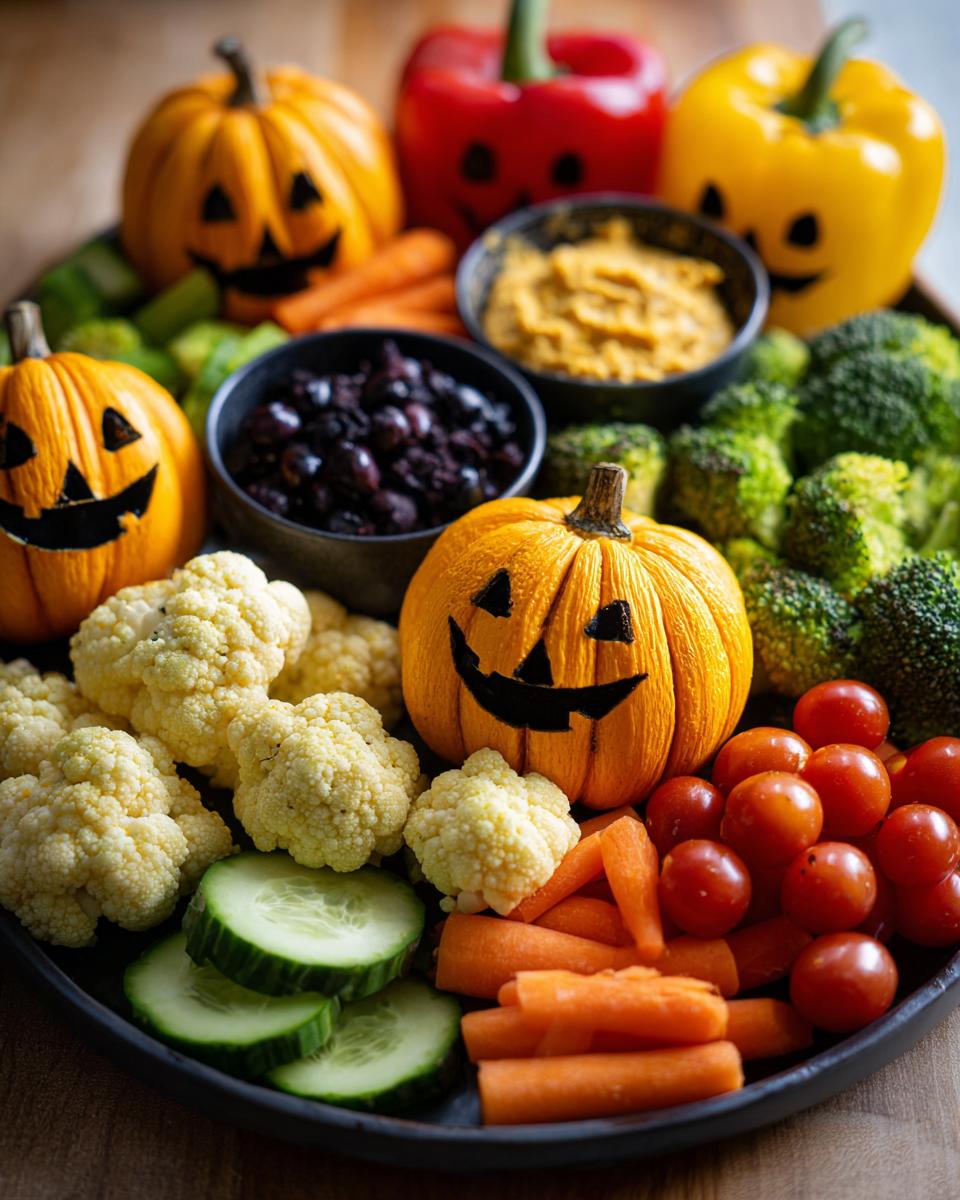
- 1 cup hummus – This creamy goodness makes the perfect “graveyard dirt” background. I like classic flavor, but roasted red pepper hummus adds extra Halloween color!
- 1 cup black olive tapenade – This dark, rich spread creates amazing contrast. If you can’t find tapenade, just chop up some extra black olives real fine.
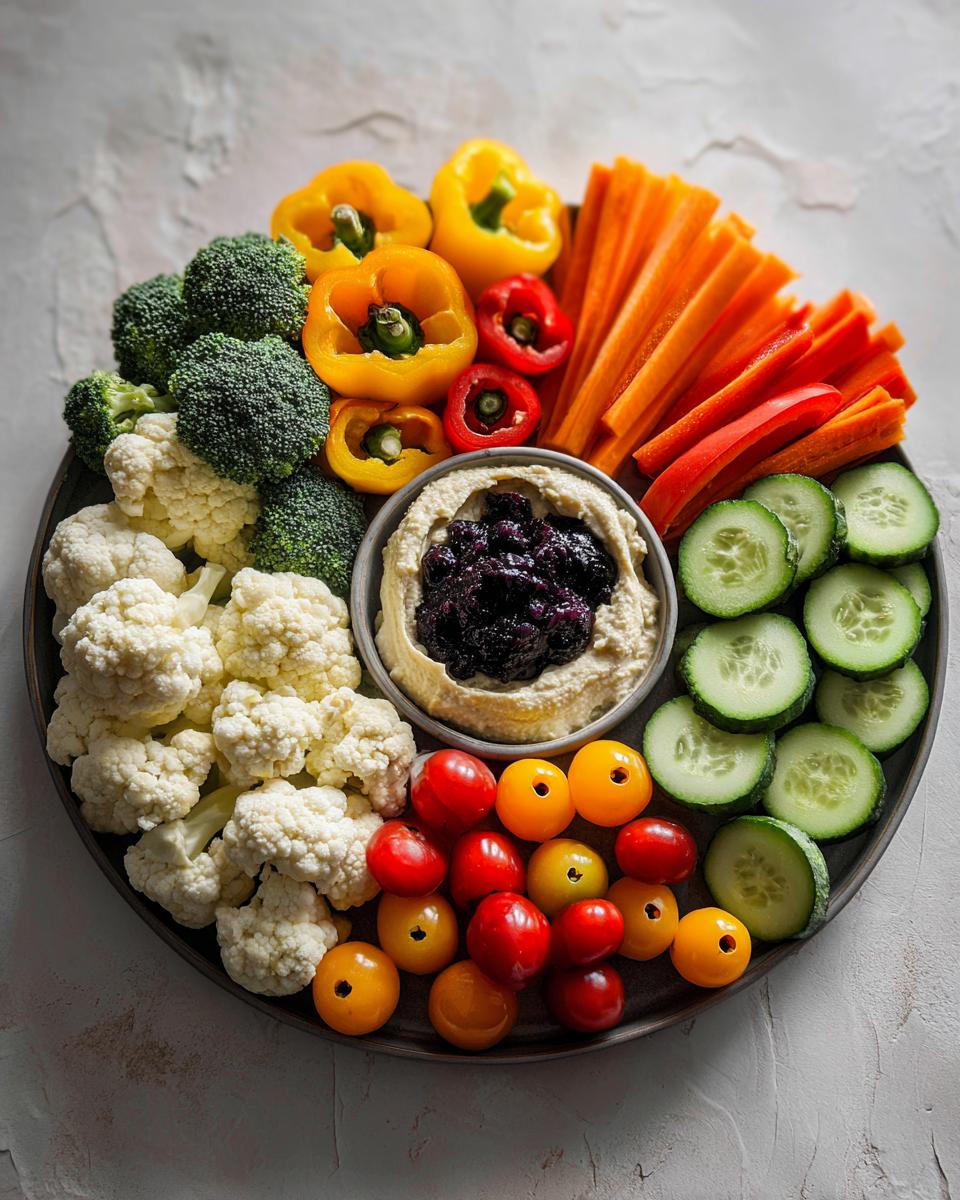
For the Vegetables (Your Little Monsters)
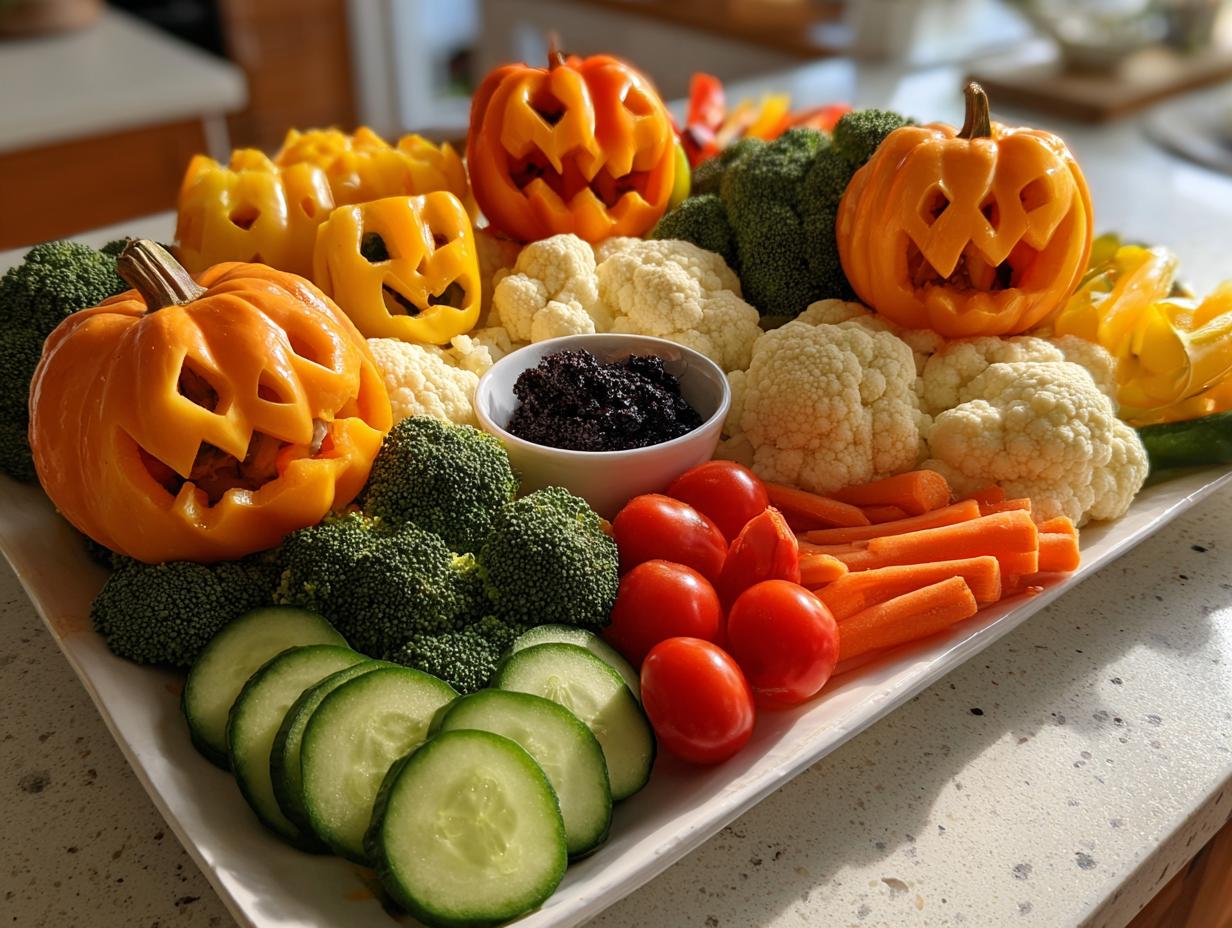
- 1 head cauliflower, cut into small florets – These make perfect “ghosts” or “tombstones”
- 1 head broccoli, cut into small florets – Great for spider webs or witch’s hair
- 1 red bell pepper, sliced into strips – Pumpkin shapes, anyone?
- 1 yellow bell pepper, sliced into strips – Ghost bodies or crescent moons
- 1 large carrot, cut into sticks – Perfect for skeleton fingers
- 1 cucumber, sliced – Makes great eyeball whites
- 10 cherry tomatoes – Tiny pumpkins or bloody eyeballs
- ¼ cup black olives, sliced – Essential for all those creepy eyes and spider bodies!
See? Nothing crazy here – just fresh veggies you probably already have. The magic happens in how we arrange them! Pro tip: grab extra olives – kids love stealing the “eyes” before the tray’s even fully assembled!
Equipment Needed for Your Halloween Veggie Tray
You won’t need any fancy equipment for this spooky snack spread – just grab these three kitchen basics:
- Large serving tray – The bigger the better! You’ll want plenty of room for your veggie masterpieces to shine.
- Sharp knife – My trusty chef’s knife is all I use to whip those peppers into ghostly shapes.
- Cutting board – Any size will do, though I prefer a big one when I’m slicing multiple veggies at once.
That’s it! See? I told you this was easy. Now let’s get to the fun part – making those veggies look frightfully delicious!
Step-by-Step Guide to Assembling Your Halloween Veggie Tray
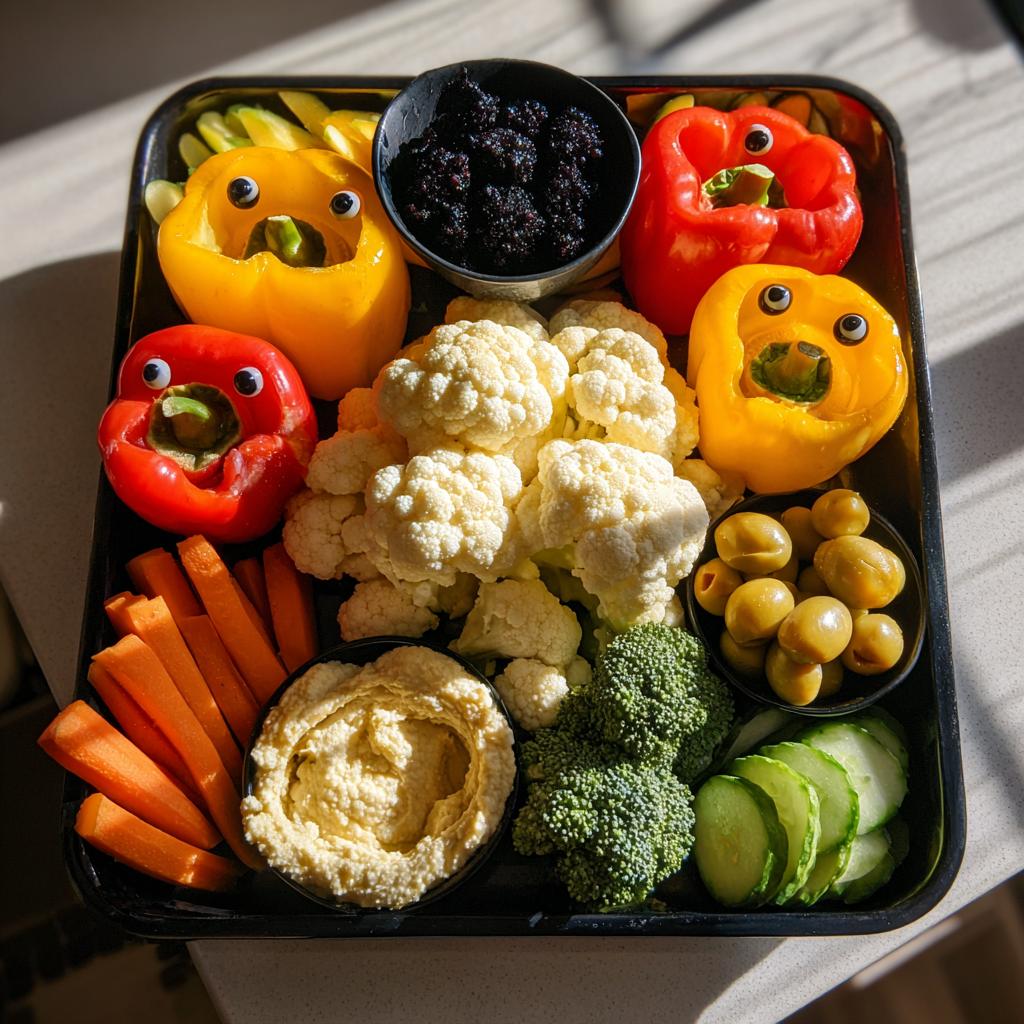
Okay, time for the fun part – turning these ordinary veggies into a Halloween masterpiece! I promise it’s easier than it looks. Just follow my simple steps, and you’ll have a tray that’ll make all the neighborhood kids say “Whoa!” (and maybe even eat their vegetables).
Creating the Spooky Base
First, grab your big serving tray and let’s make that creepy canvas! Spread the hummus over about two-thirds of the tray – this is our “graveyard dirt.” Then, use a spoon to swirl the black olive tapenade through it like creeping shadows. I like to leave some hummus showing through for texture. Pro tip: if you want to get extra fancy, use a fork to make little ridges in the hummus – it looks like freshly dug graves! (Trust me, the kids will think that’s awesome.)
Arranging the Halloween-Themed Vegetables
Now the real magic happens! Here’s how I make my veggies look haunted:
- Pepper Pumpkins & Ghosts: Cut your bell peppers into wide strips, then use kitchen scissors to notch out little jack-o-lantern faces. For ghosts, just leave them plain – they’ll look like floating spirits against the dark dip!
- Broccoli Trees: Cluster the florets together to make spooky trees or witch’s hair. Press them gently into the hummus so they stand up.
- Olive Eyeballs: This is my favorite part! Place cherry tomato halves (the “whites”) and top each with a slice of black olive (the “pupil”). Scatter them across the tray for maximum creep factor.
- Cauliflower Tombstones: Stand the florets upright and use a toothpick to attach tiny olive slices as “RIP” markings.
Remember – there’s no wrong way to do this! For more Halloween food inspiration, check out our Halloween food and drink ideas. Just have fun with it and watch your veggie tray come to (after)life!
Pro Tips for the Perfect Halloween Veggie Tray
Okay, my spooky snack-loving friends, here are my tried-and-true tricks to make your Halloween veggie tray absolutely scream-worthy (in the best way possible):
- Prep ahead like a ghostly gourmet – Chop all your veggies the night before and store them in separate containers. Just pat them dry before arranging so your dips don’t get watery.
- Cookie cutters are your BFF – Use small Halloween-shaped cutters on cucumbers, peppers, or even cheese slices for instant themed shapes!
- Keep those olives handy – I always buy extra black olives because they disappear fast (both from the tray and from little hands sneaking tastes).
- Make it interactive – Set out extra veggies and let kids build their own monster faces! Check out our Halloween snacks for more fun ideas.
Remember – the messier and creepier it looks, the better! This isn’t about perfection, it’s about having fun with your food.
Creative Variations for Your Halloween Veggie Tray
Want to take your Halloween veggie tray to the next level? Here are my favorite ways to make it even spookier (and get more veggies into those little monsters):
- Creepy Crudité Fingers – Cut celery stalks into 3-inch pieces, then make “knuckles” with small slits near the top. Add a sliced almond “fingernail” at the tip with a dab of cream cheese. So realistic it’s almost scary!
- Eyeball Radishes – Thinly slice radishes and use the same cherry tomato/olive trick, but these look especially gross and veiny (in the best Halloween way possible).
- Zucchini Spiders – Cut zucchini into rounds for bodies, then use chives or carrot strips for legs. Black olive slices make perfect little spider eyes!
Honestly, the possibilities are endless – sometimes I just raid the veggie drawer and see what spooky shapes jump out at me!
How to Store and Serve Your Halloween Veggie Tray
Okay, here’s the deal with keeping your spooky veggie tray looking fresh (but still delightfully dead-looking): If you’re prepping ahead, store the chopped veggies in an airtight container with a damp paper towel to keep them crisp. The dips? Keep those separate in the fridge until you’re ready to assemble – nothing ruins a graveyard scene like watery hummus! When it’s party time, I like to set my tray on ice to keep everything chilled – just tuck some ice packs underneath the serving platter. And here’s my secret pro tip: bring extra olives and cherry tomatoes for quick “eyeball” repairs as guests snack!
Frequently Asked Questions About Halloween Veggie Trays
Oh my gosh, I get so many questions about my Halloween veggie tray whenever I bring it to parties! Here are the ones people ask me most often (along with my slightly-too-enthusiastic answers):
Can I make my Halloween veggie tray ahead of time?
Absolutely! I usually chop all the veggies the night before and store them in separate containers with damp paper towels. Just assemble your spooky scene about an hour before the party starts – any earlier and those olive “eyeballs” might start looking a little deflated!
What other veggies work well for spooky shapes?
The sky’s the limit, really! I love using jicama for “bones,” sugar snap peas for “freckles” on monster faces, or even purple carrots for extra ghostly colors. Check out our healthy snack ideas for more inspiration. Honestly, if it’s crunchy and colorful, I’ve probably tried turning it into something Halloween-y!
Will kids actually eat veggies this way?
You’d be shocked! I’ve watched notoriously picky eaters devour cucumbers because they were shaped like ghost smiles. There’s something magical about food that looks fun – they forget they’re eating something healthy!
How long will this veggie tray stay fresh?
Your scary masterpiece will stay looking good for about 2-3 hours at room temp if you’re serving it at a party. If you need it to last longer, keep it in the fridge and put it out in batches (though honestly? It never lasts that long at my parties!).
Nutritional Information
Just a quick note – all nutritional values for this Halloween veggie tray will vary depending on your exact ingredients and portion sizes. But hey, it’s packed with fresh veggies and healthy dips, so you can feel good about serving it alongside all that Halloween candy!
Halloween Veggie Tray
Ingredients
Equipment
Method
- Spread the hummus and black olive tapenade on a large serving tray to create a spooky background.
- Arrange the cauliflower and broccoli florets around the edges to resemble a graveyard or spider webs.
- Place the red and yellow bell pepper strips to create pumpkin or ghost shapes.
- Add carrot sticks and cucumber slices for additional texture and color.
- Use cherry tomatoes and sliced black olives to make eyes or other spooky details.