Table of Contents
There’s something absolutely magical about slicing into a perfectly executed Crispy Chicken Kiev and watching that golden herb butter cascade onto your plate like liquid sunshine. This classic dish has been stealing hearts and satisfying appetites for generations, transforming humble chicken breasts into restaurant-quality masterpieces right in your own kitchen.
I’ll never forget the first time I attempted making Crispy Chicken Kiev. It was a rainy Tuesday evening, and I was determined to surprise my family with something special. After three attempts and a kitchen that looked like a flour bomb had exploded, I finally achieved that perfect golden crust with the molten garlic herb butter center. The look of pure delight on my loved ones’ faces made every messy moment worth it. That’s the beauty of this dish – it’s not just about the incredible flavors, but the joy it brings to those gathered around your table.
The Crispy Chicken Kiev has earned its place as one of the most beloved family favorite recipes because it strikes that perfect balance between impressive presentation and achievable home cooking. Whether you’re looking for easy homemade recipes to elevate your weeknight routine or planning a special dinner that will have everyone talking, this delicious dish delivers every single time.

Crispy Chicken Kiev Delight: Gourmet Weeknight Dinner Recipe
Ingredients
Nutrition
Tried this recipe?
Let us know how it was!Ingredients: Building Your Crispy Chicken Kiev Foundation
Understanding the Essential Components
Creating the perfect Crispy Chicken Kiev starts with understanding how each ingredient plays its crucial role in this culinary symphony. The star of our show is, of course, the chicken breast – but not just any chicken breast will do. You’ll need four large, boneless, skinless chicken breasts that are roughly the same size to ensure even cooking. These will serve as the canvas for our butter masterpiece.
The herb butter filling is where the magic truly happens in our Crispy Chicken Kiev recipe. You’ll need half a cup of softened unsalted butter, which acts as the base for our flavor explosion. Fresh garlic – about four cloves, minced to perfection – provides that aromatic punch that makes this dish so irresistible. Fresh parsley, about a quarter cup chopped finely, adds color and a bright, herbaceous note that cuts through the richness beautifully.
For the coating that gives our Crispy Chicken Kiev its signature crunch, we rely on a three-stage breading process. All-purpose flour creates the first layer, helping the egg wash adhere properly. Two large eggs, beaten until smooth, form the binding layer. Finally, panko breadcrumbs – about two cups – create that coveted golden, crispy exterior that makes this dish so texturally satisfying.
Selecting Premium Quality Ingredients
The difference between a good Crispy Chicken Kiev and an absolutely spectacular one often lies in the quality of your ingredients. When choosing chicken breasts, look for organic, free-range options if your budget allows. These tend to have better flavor and texture, and they’re less likely to release excess water during cooking, which can compromise your crispy coating.
Your butter choice is equally important for achieving that perfect molten center. European-style butter, with its higher fat content and lower water content, creates a richer, more luxurious filling that won’t separate during cooking. If you can find it, cultured butter adds an extra layer of complexity that will elevate your Crispy Chicken Kiev from great to extraordinary.
Fresh herbs make an enormous difference in this recipe. While dried herbs can work in a pinch, fresh parsley and chives provide a vibrant flavor and beautiful color that dried versions simply cannot match. When selecting garlic, choose firm, plump cloves without any green shoots, as these can add bitter notes to your herb butter mixture.
Smart Substitutions and Creative Alternatives
One of the beautiful things about making Crispy Chicken Kiev is its adaptability to different dietary needs and preferences. If you’re following a gluten-free diet, you can easily substitute the all-purpose flour with rice flour or your favorite gluten-free flour blend, and use gluten-free panko breadcrumbs for the coating.
For those looking to lighten up this indulgent dish, you can reduce the butter in the filling by half and add cream cheese for creaminess, or incorporate finely minced mushrooms to add bulk and umami flavor without extra calories. The herb mixture is also wonderfully flexible – try adding fresh thyme, oregano, or even a touch of lemon zest for different flavor profiles.
If you’re cooking for a larger crowd or want to experiment with different proteins, this same technique works beautifully with boneless pork chops or even thick fish fillets like cod or halibut. The cooking times will need adjustment, but the fundamental technique remains the same, making this one of those versatile easy homemade recipes that can adapt to almost any situation.

Preparation Steps: Mastering the Crispy Chicken Kiev Technique
Initial Preparation and Essential Setup Tips
Success with Crispy Chicken Kiev begins long before you heat your oil. Start by setting up three shallow dishes for your breading station – one for flour, one for beaten eggs, and one for panko breadcrumbs. This assembly line approach will keep your hands from getting too messy and ensure a smooth, efficient process.
Preparing your chicken properly is crucial for achieving that perfect pocket that will hold your herb butter. Place each chicken breast between sheets of plastic wrap or parchment paper, and gently pound them to an even thickness of about half an inch using a meat mallet or rolling pin. The key word here is “gently” – you want to flatten and tenderize the meat without tearing it. This step ensures even cooking and makes it easier to roll and seal your Crispy Chicken Kiev properly.
Creating the herb butter mixture is where you can really let your creativity shine. In a medium bowl, combine your softened butter with minced garlic, chopped parsley, a pinch of salt, and freshly cracked black pepper. Mix until everything is well incorporated, then transfer the mixture to a piece of plastic wrap. Shape it into a log about 4 inches long, wrap tightly, and refrigerate for at least 30 minutes. This chilling step is essential – it allows the butter to firm up, making it much easier to work with during assembly.
Step-by-Step Assembly with Professional Secrets
Now comes the fun part – assembling your Crispy Chicken Kiev! Remove the herb butter from the refrigerator and cut it into four equal portions. Place one portion in the center of each flattened chicken breast, keeping it about an inch away from all edges. This placement is crucial for preventing butter leakage during cooking.
Here’s a professional secret that makes all the difference: before rolling, lightly dampen your fingers with cold water. This prevents the chicken from sticking to your hands and makes the rolling process much smoother. Starting from the bottom edge, carefully roll the chicken breast around the butter, tucking in the sides as you go to create a neat, tight package. The seam should be on the bottom, and you should have what looks like a small chicken burrito.
The breading process requires patience and attention to detail for the perfect Crispy Chicken Kiev. First, roll each stuffed breast in flour, shaking off any excess. Next, dip it in the beaten eggs, making sure every surface is coated. Finally, roll it in the panko breadcrumbs, pressing gently to ensure the crumbs adhere well. For an extra-crispy coating, you can repeat the egg and breadcrumb steps. Once breaded, place your Crispy Chicken Kiev on a plate and refrigerate for at least 20 minutes – this helps the coating set and reduces the risk of it falling off during cooking.
Avoiding Common Pitfalls and Kitchen Disasters
Even experienced cooks can run into trouble with Crispy Chicken Kiev, but knowing the common mistakes helps you avoid them. The biggest culprit is using butter that’s too soft or not chilling the assembled kievs long enough before cooking. If your butter is too warm, it will leak out during cooking, leaving you with empty chicken and a mess in your pan.
Another frequent mistake is overcrowding the pan during frying. Each piece needs space to cook evenly and develop that beautiful golden crust. Cook your Crispy Chicken Kiev in batches if necessary – patience here pays off with superior results. The oil temperature is also critical; too hot and the outside burns before the inside cooks through, too cool and you’ll end up with greasy, soggy coating instead of that coveted crispiness.
Temperature monitoring is your best friend when making this dish. Use a meat thermometer to ensure your chicken reaches an internal temperature of 165°F (74°C). If you notice the outside browning too quickly, you can finish cooking in a 375°F oven for 10-15 minutes. This technique ensures perfectly cooked chicken with a crispy exterior and that gorgeous, molten butter center that makes Crispy Chicken Kiev so special.

Serving & Final Touches: Presenting Your Culinary Masterpiece
Creative Presentation Ideas That Wow
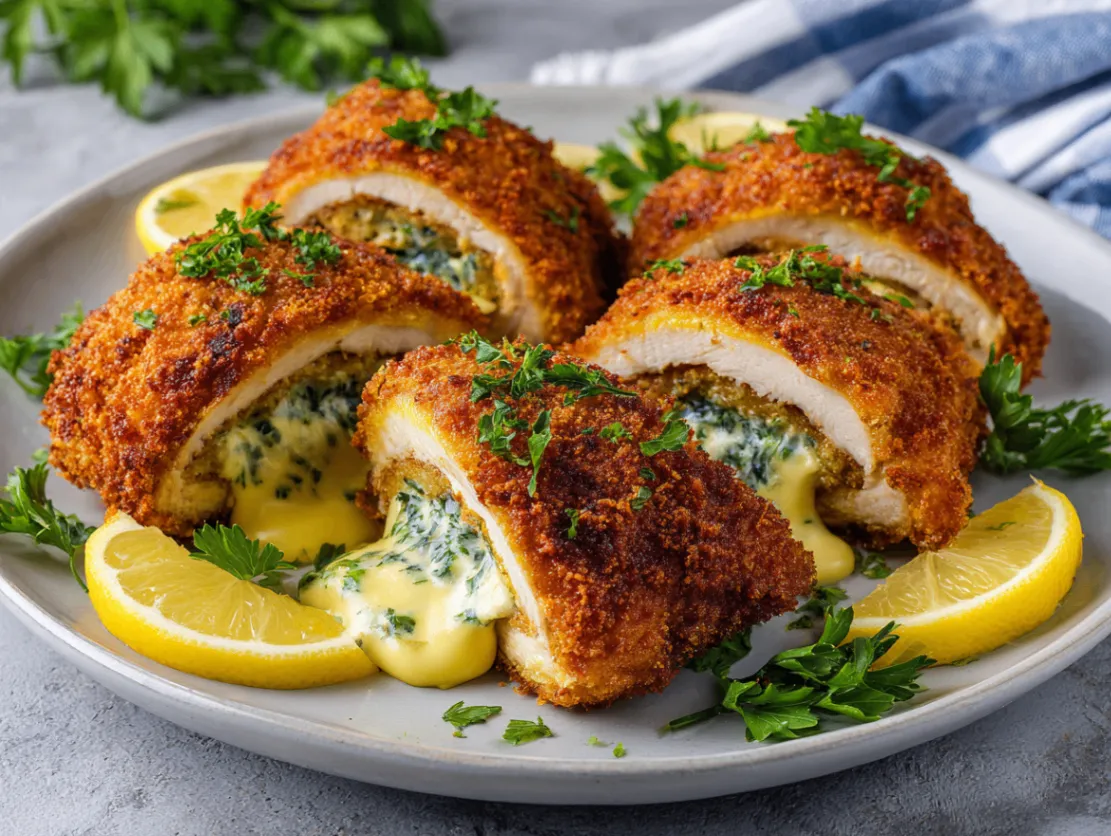
The presentation of your Crispy Chicken Kiev is almost as important as the cooking itself. These golden beauties deserve to be showcased properly! Start by letting your cooked kievs rest for about 5 minutes after cooking – this allows the juices to redistribute and makes slicing much cleaner. When ready to serve, use a sharp knife to cut each piece diagonally, creating an elegant angled cut that shows off the beautiful cross-section and allows that herb butter to flow dramatically.
For an restaurant-style presentation, warm your plates in a low oven before plating. Place each sliced Crispy Chicken Kiev slightly off-center on the plate, allowing space for your chosen sides. A light sprinkle of fresh herbs – perhaps some of the same parsley you used in the butter – adds a pop of color and ties the dish together visually. A small wedge of lemon on the side not only looks professional but provides a bright acidic note that guests can add if desired.
Consider drizzling a complementary sauce around the plate for added visual appeal and flavor complexity. A simple pan sauce made from the drippings in your cooking pan, deglazed with white wine and finished with a touch of cream, elevates this already impressive dish to restaurant quality. The key is keeping any additional sauces light so they don’t compete with the star of the show – that incredible herb butter filling.
Perfect Pairings and Complementary Side Dishes
Choosing the right sides for your Crispy Chicken Kiev can make the difference between a good meal and an unforgettable dining experience. Traditional accompaniments include buttery mashed potatoes, which provide a creamy, comforting base that soaks up any escaped herb butter beautifully. For a lighter option, try roasted fingerling potatoes with rosemary – their crispy skin provides a nice textural contrast while their fluffy interior complements the rich chicken.
Vegetable pairings should balance the richness of the dish while adding color and nutrition to your plate. Steamed asparagus with a squeeze of lemon is classic for good reason – its slight bitterness cuts through the butter while its bright green color creates visual appeal. Roasted Brussels sprouts with bacon bits add a smoky element that pairs wonderfully with the garlic and herbs. For something different, try honey-glazed carrots or a simple mixed green salad with a light vinaigrette.
Don’t overlook the importance of bread in rounding out this meal. A crusty baguette or dinner rolls allow diners to soak up every last drop of that precious herb butter. For wine pairings, consider a crisp Sauvignon Blanc or a light Pinot Noir – both complement the rich, herby flavors without overwhelming the palate. This attention to the complete dining experience is what transforms your Crispy Chicken Kiev from a simple dinner into one of those memorable family favorite recipes that becomes part of your regular rotation.
Storage Solutions and Reheating Mastery
Proper storage techniques ensure you can enjoy leftover Crispy Chicken Kiev without compromising quality. If you have uncooked, breaded kievs, they can be stored in the refrigerator for up to 24 hours or frozen for up to three months. When freezing, place them on a baking sheet until solid, then transfer to freezer bags to prevent them from sticking together. This make-ahead capability makes this recipe perfect for meal planning and entertaining.
Cooked Crispy Chicken Kiev should be stored in the refrigerator within two hours of cooking and consumed within 3-4 days. The key to successful reheating is avoiding the microwave, which will make your crispy coating soggy. Instead, reheat in a 350°F oven for 15-20 minutes, or until heated through. Cover loosely with foil to prevent over-browning while the inside warms up.
For the best reheating results, slice the leftover kiev before warming – this allows heat to penetrate more evenly and reduces reheating time. You can also repurpose leftovers creatively by slicing and adding to salads, pasta dishes, or sandwiches. The herb butter flavor remains delicious even when cold, making this one of those delicious dishes that provides multiple meal opportunities from a single cooking session.


Frequently Asked Questions
Q1: Can I prepare Crispy Chicken Kiev ahead of time? Absolutely! This is one of the best features of this recipe. You can assemble and bread your kievs up to 24 hours in advance and keep them refrigerated until ready to cook. For longer storage, freeze them for up to 3 months. Just remember to add a few extra minutes to the cooking time if cooking from frozen, and always ensure the internal temperature reaches 165°F.
Q2: Why does the butter leak out of my Crispy Chicken Kiev? Butter leakage is usually caused by inadequate sealing or butter that’s too soft during assembly. Make sure your herb butter is properly chilled and firm before using. Seal the chicken tightly around the butter, ensuring there are no gaps or thin spots in the meat. The chilling period after breading is crucial – don’t skip this step as it helps everything set properly.
Q3: Can I bake Crispy Chicken Kiev instead of frying? Yes! For a healthier version, you can bake your kievs at 400°F for 25-30 minutes, turning once halfway through. Brush the tops lightly with melted butter or cooking spray before baking to help achieve a golden color. While the texture won’t be quite as crispy as the fried version, you’ll still get delicious results with significantly less oil.
Q4: What’s the best oil temperature for frying Crispy Chicken Kiev? The ideal oil temperature is 350°F (175°C). Use a thermometer to monitor this carefully – too hot and the outside burns before the inside cooks, too cool and you’ll get greasy results. If you don’t have a thermometer, test with a small piece of bread; it should sizzle immediately and turn golden brown within 60 seconds.
Q5: How do I know when my Crispy Chicken Kiev is properly cooked? The most reliable method is using a meat thermometer inserted into the thickest part of the chicken – it should read 165°F (74°C). Visually, the coating should be golden brown and crispy, and the chicken should feel firm when gently pressed. If you’re uncertain, it’s better to cook a bit longer than to serve undercooked chicken.
Conclusion: Your Journey to Crispy Chicken Kiev Mastery
Making perfect Crispy Chicken Kiev is truly a journey of discovery, one that rewards patience, attention to detail, and a willingness to embrace the delicious mess that comes with creating something extraordinary in your kitchen. This isn’t just another recipe – it’s an experience that brings families together around the dinner table, creates lasting memories, and transforms ordinary weeknight dinners into special occasions.
The beauty of mastering this classic dish lies not just in the incredible flavors and textures, but in the confidence it builds in your cooking abilities. Once you’ve successfully navigated the process of stuffing, rolling, breading, and frying these golden beauties, you’ll find yourself approaching other challenging recipes with newfound courage and enthusiasm.
I encourage you to make this recipe your own. Experiment with different herbs in your butter mixture, try various coating techniques, or explore different presentation styles. Every time you make Crispy Chicken Kiev, you’re not just following a recipe – you’re participating in a culinary tradition that has brought joy to countless tables around the world.
Don’t be discouraged if your first attempt isn’t picture-perfect. Even professional chefs had to practice this technique multiple times before achieving mastery. The most important thing is to enjoy the process, learn from each attempt, and savor the delicious results along the way.
I’d love to hear about your Crispy Chicken Kiev adventures! Share your photos, variations, and stories in the comments below or on social media. There’s something truly special about connecting with fellow home cooks who appreciate the art of creating these delicious dishes from scratch. Happy cooking, and may your kitchen always be filled with the golden, crispy perfection of homemade Chicken Kiev!